Mobile Remote Access
Use Kandev from a phone through Tailscale, Cloudflare Tunnel, or a private VPN.
This how-to guide connects a phone to Kandev through Tailscale, Cloudflare Tunnel, or a private VPN.
Anyone who can reach an unauthenticated Kandev origin has administrator access. Use a protected network boundary.
Use task controls on a phone
The controls above the message composer keep task actions within reach. When the task's pull requests are all merged or all closed without merging, a full-width notice appears above the controls. Choose Archive to archive the task using your confirmation preference, or dismiss the notice with X. Dismissal hides the notice without archiving the task.
Todo, usage, sharing, and conversation controls remain available below the notice. Extra controls wrap onto another line on narrow screens. The action labelled with the next workflow step still moves the task to that step. In task Chat, that action occupies a right-aligned row above the transcript utility icons, with the message composer below those icons.
Confirm an action on a phone
Archiving from the Tasks sheet shows a dedicated confirmation step in that same sheet. Review the task name, cleanup effects, and optional subtask selection. The sheet shrinks to fit a short decision, with Archive and Cancel just below the details and above the phone's safe area. Longer details scroll without moving those buttons off screen.
Choose Cancel or Back to restore the list or editor's original height, draft values, filters, and scroll position. Swiping the sheet away or tapping its backdrop cancels the decision and closes the sheet. From the board or a page, archive opens a compact bottom sheet. Inside the command panel, confirmation stays in the panel and Cancel keeps your search query. The archive-confirmation preference and cleanup behavior are unchanged.
The same pattern applies to other inline confirmations:
- Session deletion and terminal closing stay inside their open picker. Saved sidebar, Threads, GitHub, and GitLab views stay inside their filter/editor sheet. These sheets fit the confirmation's content instead of keeping the taller picker or editor height. GitHub's Views picker and GitLab's phone filters also open from the bottom.
- File deletion, chat context reset, plan revision restore, subtask detachment, and walkthrough discard use a compact sheet from the page. Resetting context inside Quick Chat stays in that dialog.
- Deleting saved prompts, layouts, agent profiles, or views from a menu opens a compact sheet. The menu closes first, leaving only one active decision.
- Removing integrations, watches, secrets, or plugins, and changing a user's role or status uses the same named confirmation. Secret values are never included in the confirmation.
- Removing workflow sync is a step in its existing configuration dialog. Cancel returns to the draft; a failed removal keeps the confirmation available to retry.
Full task-delete and discard-consent dialogs retain their existing layout and safeguards, as do in-use conflict and system maintenance dialogs. File deletion also uses a compact sheet on touch tablets. Other desktop and tablet confirmation layouts are unchanged.
How a phone request reaches an agent
Each protected path reaches the same Kandev origin. Kandev then sends task work to the selected executor.
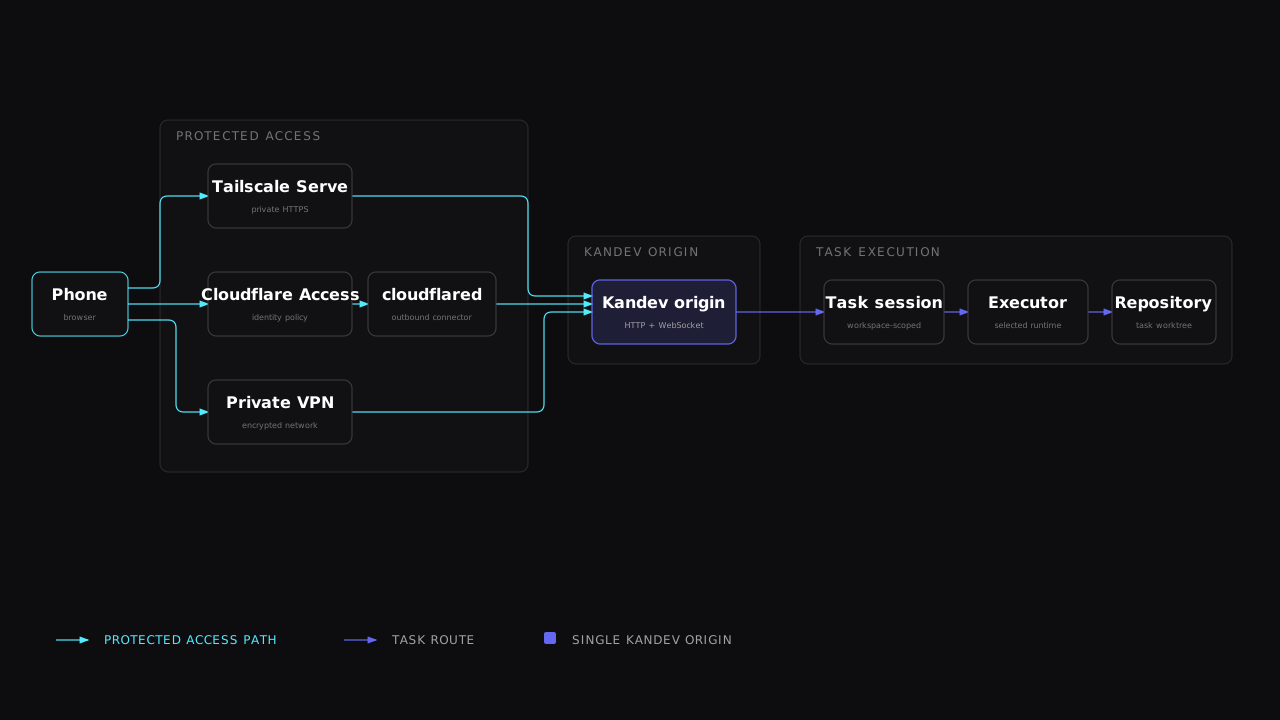

The diagram shows the important boundary: Tailscale Serve, Cloudflare Access with
cloudflared, and a private VPN are alternative protected paths to the same
Kandev origin. Kandev then owns the task session and routes work to the selected
executor and repository.
The access path protects the Kandev origin. Each path reaches the same Kandev web app and task features. Kandev authentication remains a separate user and workspace boundary.
Choose an access boundary
Use one of these boundaries:
| Use case | Network boundary | Kandev authentication |
|---|---|---|
| One person, trusted phone and host | Private tailnet with a narrow Tailscale grant | Optional |
| One person, another private VPN | Private VPN address plus host firewall | Optional |
| One person, Cloudflare Tunnel | Cloudflare Access policy for one trusted identity | Optional |
| Multiple people or less-trusted devices | Private network or authenticated TLS proxy | Required |
| Public internet | Do not expose Kandev directly | Required behind a protected TLS proxy |
When authentication is disabled, Kandev gives every reachable client one synthetic administrator identity.
Enable Authentication and Users for accounts, private workspaces, sessions, or personal access tokens.
Connect with Tailscale
This path keeps Kandev on loopback. Tailscale Serve provides the tailnet listener and HTTPS endpoint.
- Install Tailscale on the Kandev host and phone.
- Sign in to the same tailnet on both devices.
- If the tailnet does not use MagicDNS, enable it.
- Start Kandev on a fixed loopback port.
KANDEV_SERVER_HOST=127.0.0.1 KANDEV_BACKEND_PORT=38429 kandev- In another host terminal, publish that loopback service inside the tailnet.
tailscale serve --bg http://127.0.0.1:38429
tailscale serve status- Open the HTTPS URL that
tailscale serveprints on the phone.
The URL uses the full MagicDNS name of the host, such as https://kandev-host.example.ts.net.
Tailscale Serve terminates HTTPS and keeps the endpoint inside the tailnet. Do not use Tailscale Funnel because Funnel publishes the endpoint to the internet.
If Kandev runs as a managed service, use the service guide. Make sure that the backend port remains fixed before you keep a Serve rule.
Restrict the tailnet connection
Tailscale recommends grants for new access-control policies. Legacy ACL rules continue to work.
Tag the Kandev host as tag:kandev. Then add a grant like this to the tailnet policy:
{
  "tagOwners": {
    "tag:kandev": ["[email protected]"]
  },
  "grants": [
    {
      "src": ["[email protected]"],
      "dst": ["tag:kandev"],
      "ip": ["tcp:443"]
    }
  ]
}
Replace [email protected] with the identity that owns the phone. Keep other required rules in the same policy file.
The grant permits only that identity to reach HTTPS on tagged Kandev hosts. Read the Tailscale grants reference before you replace an existing policy.
Connect with Cloudflare Tunnel
Cloudflare Tunnel gives Kandev a public HTTPS hostname without a public origin address. The cloudflared connector makes an outbound connection from the Kandev host.
The hostname is public unless Cloudflare Access protects it. Create the Access application before you add the tunnel route.
Protect the hostname with Cloudflare Access
- Add your domain to Cloudflare and create a Cloudflare Zero Trust organization.
- In the Cloudflare dashboard, go to Zero Trust > Access controls > Applications.
- Select Create new application.
- Select Self-hosted and private.
- Add a public hostname, such as
kandev.example.com. - Add an Allow policy for the identity that can use Kandev.
- Select the required identity provider or one-time PIN method.
- Create the application.
Access denies requests that do not match an Allow policy. Read the Cloudflare self-hosted application guide for policy details.
For one trusted person, Cloudflare Access can be the external access boundary. If the policy allows multiple people, also enable Kandev authentication.
Cloudflare identities do not become Kandev accounts. Without Kandev authentication, all permitted Access users share the synthetic Kandev administrator.
Start Kandev on loopback
Start Kandev on a fixed loopback port:
KANDEV_SERVER_HOST=127.0.0.1 KANDEV_BACKEND_PORT=38429 kandevIf Kandev runs as a service, configure the same loopback address and fixed port.
Follow Bind safely and the fixed-port workaround.
Install and configure cloudflared
- In the Cloudflare dashboard, go to Networking > Tunnels.
- Create a tunnel and select the
cloudflaredconnector. - Select the operating system and architecture of the Kandev host.
- Copy the installation command that Cloudflare provides.
- Run the command on the Kandev host.
The service command has this form:
sudo cloudflared service install <TUNNEL_TOKEN>The tunnel token is a secret. Do not commit it or paste it into Kandev tasks, logs, or chat.
Only one cloudflared service can run on a host. If one exists, add the Kandev route to its tunnel.
- Add a Public hostname route for
kandev.example.com. - Select
HTTPas the service type. - Enter
127.0.0.1:38429as the service URL. - Enable Protect with Access for the route.
- Save the route and wait for the connector to become healthy.
- Open
https://kandev.example.comon the phone. - Complete the Cloudflare Access sign-in.
Keep the default HTTP Host header so browser requests use the public hostname.
Cloudflare Tunnel supports WebSockets. The web app, composers, live updates, and terminal connections can use the same protected hostname.
Read the Cloudflare Tunnel guide for connector installation and network requirements.
Connect directly through a VPN
If the VPN gives the host a stable address, bind Kandev to that address:
KANDEV_SERVER_HOST=100.100.100.100 KANDEV_BACKEND_PORT=38429 kandevReplace the example address with the private VPN address. Then open http://100.100.100.100:38429 from the connected phone.
Some VPNs require an all-interface bind:
KANDEV_SERVER_HOST=0.0.0.0 KANDEV_BACKEND_PORT=38429 kandev0.0.0.0 also listens on LAN and public interfaces. A Tailscale grant does not control traffic that arrives outside Tailscale.
If you use this bind, permit port 38429 only on the VPN interface in the host firewall. Reject that port on every other interface.
If more than one person can reach the VPN endpoint, use Kandev authentication and TLS.
Kandev authentication does not replace HTTPS. For single-user access on an encrypted VPN, the VPN tunnel provides transport encryption. Plain HTTP inside that tunnel is acceptable.
Add Kandev to the home screen
Kandev includes an installable web-app manifest and standalone display mode. The installed shortcut opens Kandev without a normal browser tab bar.
Use an HTTPS Kandev URL for standalone installation. The Tailscale Serve and Cloudflare Tunnel paths provide HTTPS. Direct HTTP access may create only a home-screen shortcut, not an installable standalone web app.
On iPhone or iPad:
- Open the Kandev URL in Safari.
- Select Share.
- Select Add to Home Screen.
- Open Kandev from the new icon.
On Android:
- Open the Kandev URL in Chrome.
- Open the browser menu.
- Select Install app or Add to Home screen.
- Open Kandev from the new icon.
The shortcut does not add offline support. The Kandev host and VPN must remain reachable.
Troubleshoot the connection
- On the Kandev host, run
tailscale status. On iOS or Android, check the Tailscale app instead. - If you use Serve, run
tailscale serve statuson the Kandev host. - For Cloudflare Tunnel, review the connector status in the Cloudflare dashboard.
- Open
/readyon the same Kandev origin. - Review the host firewall and the tailnet or Access policy.
- Review the actual Kandev port in the startup output or service logs.
If the page loads but live updates fail, make sure that the proxy forwards the whole origin and supports WebSockets.
See Security and Trust for the complete boundary.